Lumarian
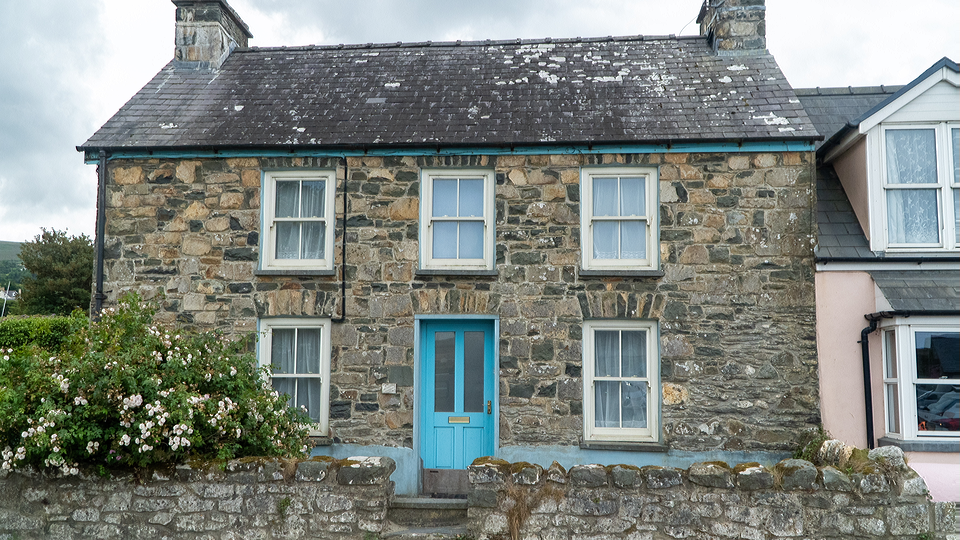 Lumarian applying gamma-curved contrast, edge enhancement, and chroma inversion to sculpt a luminance-driven color composition.
Overview
Lumarian is a comprehensive color correction and edge enhancement program. It combines a traditional proc amp (contrast and brightness), adjustable gamma curve, variable-frequency edge enhancement, saturation control, inversions, and luminance threshold keying into a single processing chain. Each stage feeds the next, so adjustments at one point in the chain ripple through all downstream stages.
At subtle settings, Lumarian provides gentle color correction: a slight lift to contrast, a nudge to gamma, a touch of edge sharpening. At extreme settings, it becomes a dramatic image sculpting tool: crushed blacks, blazing highlights, razor-sharp edges folded into psychedelic shapes by the rectifier, and hard luminance keys that carve the image into bright islands floating in darkness.
Lumarian processes all three channels (Y, U, V) but its strongest personality lives in the luminance path. The six knobs sculpt brightness, contrast, tonal curves, and edge detail: the chroma controls complement that work without stealing focus.
What's In a Name?
The name Lumarian blends luma: the brightness component of a video signal: with the suffix -arian, suggesting one who studies or practices an art. A lumarian is a practitioner of light. There's also a nod to luminary, a source of light or inspiration, and a hint of the mythic: ancient civilizations that mastered the mysteries of illumination.
Quick Start
- Feed a video source and turn Contrast (Knob 1) clockwise past the midpoint. The image gains punch as shadows deepen and highlights bloom.
- Sweep Gamma (Knob 4) from one extreme to the other. Below center, midtones are crushed into shadow; above center, they are lifted toward brightness. Return to center for a neutral curve.
- Turn up Edge Gain (Knob 5) while slowly increasing Edge Cutoff (Knob 6). Fine edges appear as bright halos around contours in the image.
- Toggle Luma Invert (Switch 7). The entire luminance channel flips: what was bright becomes dark, and the edge enhancement and threshold stages respond to the inverted tones.
Parameters
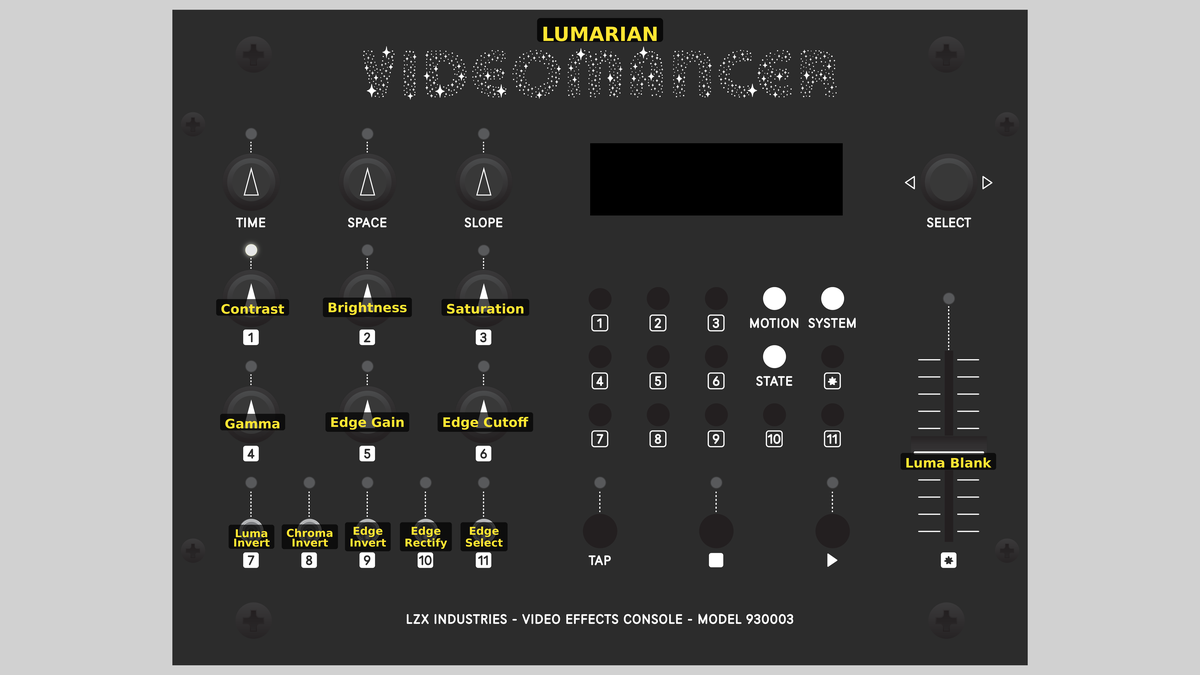 Videomancer's front panel with Lumarian active. Knobs 1–6 (top two rows of left cluster), Toggle switches 7–11 (bottom row of left cluster), Fader 12 (right side).
Knob 1 — Contrast
| Property | Value |
|---|---|
| Range | 0.0% – 200.0% |
| Default | 100.1% |
Contrast adjusts the gain applied to the luminance channel. At the center position (100.0%), the input passes through at unity gain. Turning counterclockwise toward 0.0% fades luminance toward a flat mid-gray. Turning clockwise toward 200.0% stretches the tonal range, blowing out highlights and crushing shadows. Contrast is the first processing stage, so its effect cascades through gamma, edge enhancement, and threshold.
Contrast above 100% combined with a gentle Gamma adjustment is the fastest path to a punchy, cinematic look.
Knob 2 — Brightness
| Property | Value |
|---|---|
| Range | -1.000 – 1.000 |
| Default | 0.001 |
Brightness shifts the luminance channel up or down by adding a constant offset after the contrast gain stage. At the center position (0.000), no offset is applied. Turning counterclockwise toward −1.000 darkens the entire image uniformly. Turning clockwise toward 1.000 brightens it. Because brightness is applied after contrast, it shifts the entire tonal range without changing its spread.
Knob 3 — Saturation
| Property | Value |
|---|---|
| Range | 0.0% – 200.0% |
| Default | 100.1% |
Saturation controls the gain applied to both chrominance channels (U and V). At the center position (100.0%), color saturation is unchanged. Turning counterclockwise toward 0.0% fades color toward monochrome. Turning clockwise toward 200.0% intensifies colors, pushing them toward clipping.
The saturation proc amp uses a fixed brightness offset of 512 (mid-scale), which preserves the chroma zero-point. Saturation below the center position desaturates; above center, it oversaturates.
Knob 4 — Gamma
| Property | Value |
|---|---|
| Range | -2.000 – 2.000 |
| Default | 0.002 |
Gamma reshapes the luminance transfer curve. The processing stage generates two curves from a shared squarer: an exponential curve (input squared) and a logarithmic curve (inverted squared complement): and crossfades between them. At the center position (0.000), the two curves blend into a roughly linear response. Turning counterclockwise toward −2.000 applies the exponential curve, compressing midtones toward black. Turning clockwise toward 2.000 applies the logarithmic curve, lifting midtones toward white.
Gamma is the most powerful tonal control. A small adjustment around center yields natural-looking correction. Extreme values create dramatic contrast curves that reveal hidden detail in shadows or highlights.
Knob 5 — Edge Gain
| Property | Value |
|---|---|
| Range | 0.0% – 200.0% |
| Default | 0.0% |
Edge Gain controls the amplitude of the edge enhancement signal. At 0.0%, no enhancement is applied and the signal passes through from the gamma stage unchanged. Increasing the value toward 200.0% progressively amplifies high-frequency detail extracted by the variable filter, adding bright halos along contours. The edge signal is scaled by a differential multiplier and blended back into the image.
Knob 6 — Edge Cutoff
| Property | Value |
|---|---|
| Range | 0.0% – 100.0% |
| Default | 0.0% |
Edge Cutoff sets the frequency threshold for the variable high-pass filter inside the edge enhancement stage. At 0.0%, only the finest, highest-frequency edges are extracted. Increasing the value toward 100.0% lowers the cutoff, admitting progressively broader spatial frequencies. At high values, large-scale contrast transitions are treated as "edges," producing a more dramatic, poster-like enhancement.
High Edge Gain combined with low Edge Cutoff amplifies very fine detail and noise. With a noisy source, start with a moderate cutoff before increasing gain.
Switch 7 — Luma Invert
| Property | Value |
|---|---|
| Off | Off |
| On | On |
| Default | Off |
Luma Invert applies a bitwise complement to the luminance channel. When set to On, every pixel's brightness is flipped: bright becomes dark and dark becomes bright. This inversion occurs after the edge enhancement stage but before the threshold key, so it reverses the luminance values that the threshold compares against.
Switch 8 — Chroma Invert
| Property | Value |
|---|---|
| Off | Off |
| On | On |
| Default | Off |
Chroma Invert applies a bitwise complement to both U and V chrominance channels simultaneously. When set to On, colors shift to their complementary hues: reds become cyan, blues become yellow, greens become magenta. Chroma inversion happens early in the pipeline, before the saturation proc amp, so the inverted colors are then scaled by the Saturation control.
Switch 9 — Edge Invert
| Property | Value |
|---|---|
| Off | Off |
| On | On |
| Default | Off |
Edge Invert flips the polarity of the edge enhancement signal within the rectifier stage. When set to On, bright edge halos become dark edge grooves, and vice versa. This toggle modifies bit 0 of the 3-bit rectifier mode, working in combination with Edge Rectify and Edge Select to produce eight distinct edge shaping behaviors.
Switch 10 — Edge Rectify
| Property | Value |
|---|---|
| Off | Off |
| On | On |
| Default | Off |
Edge Rectify enables full-wave rectification of the edge signal. When set to On, the rectifier folds the negative portion of the high-pass filter's output up to become positive, doubling the visible edge frequency: a "both sides of the edge" effect where every contour shows as a bright line regardless of the direction of the luminance transition.
Switch 11 — Edge Select
| Property | Value |
|---|---|
| Off | Single |
| On | Both |
| Default | Single |
Edge Select chooses between single-edge and dual-edge modes. When set to Single, the edge enhancement responds to only one polarity of luminance transition: either light-to-dark or dark-to-light depending on the Edge Invert setting. When set to Both, both polarities produce visible edge lines. This toggle modifies bit 2 of the 3-bit rectifier mode, enabling half-wave rectification behavior.
Fader 12 — Luma Blank
| Property | Value |
|---|---|
| Range | 0.0% – 100.0% |
| Default | 0.0% |
Luma Blank applies a luminance threshold key at the final stage of the processing chain. At 0.0%, all pixels pass through. As the value increases toward 100.0%, pixels whose luminance falls below the threshold are replaced with black (Y=0) and neutral color (U=V=512). At high values, only the brightest areas of the image survive.
Luma Blank interacts powerfully with Gamma. Use gamma to reshape the brightness distribution, then use the threshold to carve the result into a luminance key mask. Combine with Edge Gain to produce glowing edge outlines floating over black.
Background
The proc amp
A processing amplifier, or proc amp, is the most fundamental building block in analog and digital video processing. It applies two operations to a signal: gain (contrast) and offset (brightness). The formula is output = (input − midpoint) × contrast / midpoint + brightness. Lumarian's luminance proc amp is the first stage in the processing chain, setting the tonal foundation for everything that follows. The saturation proc amp uses the same math on U and V, with a fixed brightness offset at mid-scale to preserve the chroma zero-point.
Gamma correction
Gamma describes the nonlinear relationship between signal value and perceived brightness. In the physical world, doubling the voltage in a CRT display more than doubles the brightness because the phosphor response follows a power law. Gamma correction compensates for this curve (or intentionally distorts it for creative effect.)
Lumarian's gamma stage doesn't use a lookup table or a true power function. Instead, it approximates gamma curves algebraically by computing two shapes: an exponential curve (the input squared, which compresses midtones) and a logarithmic curve (the complement squared and subtracted from maximum, which expands midtones). A crossfade interpolator blends between these two curves based on the control value. The result is a smoothly adjustable transfer curve that reshapes the midtone distribution.
Edge enhancement
Edge enhancement, also called unsharp masking in photography, sharpens an image by emphasizing transitions between adjacent tonal regions. Lumarian extracts edges using a variable high-pass filter: a filter whose cutoff frequency is adjustable via the Edge Cutoff control. The high-pass output contains only the rapid transitions in the image. This edge signal is then shaped by a complex rectifier that can invert, half-wave rectify, or full-wave rectify the signal in eight combinations, and finally scaled by a differential multiplier controlled by Edge Gain before being blended back into the image.
Signal Flow
Signal Flow Notes
Two key structural details:
-
Y path dominates latency. The luminance chain passes through three heavyweight processing blocks: proc amp (9 cycles), gamma (squarer + interpolator, ~14 cycles), and edge enhance (filter + rectifier + multiplier, ~18 cycles): for a total processing latency of roughly 47 clock cycles. The chroma channels are much shorter (invert + proc amp + delay), so a 33-stage delay line aligns U/V with the Y output. The sync path uses a matched 47-stage shift register.
-
Edge enhancement is a parallel blend. The enhance stage does not simply add edges to the signal. It runs the gamma output through a variable filter to extract high-frequency content, shapes it through the rectifier, then uses a differential multiplier to blend the shaped edge signal back with the original. When Edge Gain is zero, the original passes through unchanged. When Edge Gain is high, edges are amplified and added.
Order matters. Contrast and brightness shape the raw signal, gamma reshapes the curve, edges are extracted from the gamma-corrected signal, inversion is applied last before threshold. Each stage transforms what the next stage sees.
Exercises
These exercises progress from basic color correction to creative edge sculpting. Each exercise builds on the previous one, engaging more of the processing chain.
Exercise 1: Classical Color Correction
 Classical Color Correction — simulated result across source images.
Exercise Illustration
A description of the exercise illustration.
Learning Outcomes
Learn how the proc amp and gamma stages interact to achieve balanced color correction.
Key Concepts
- Contrast scales the tonal range; brightness shifts it
- Gamma reshapes the midtone distribution without clipping
- Saturation controls color intensity independently of luminance
Video Source
A live camera feed or recorded footage with a mix of shadow, midtone, and highlight areas.
Steps
- Boost contrast: Turn Contrast (Knob 1) clockwise to about 130%. The image gains dynamic range (shadows darken, highlights brighten.)
- Compensate brightness: Adjust Brightness (Knob 2) slightly counterclockwise to bring the overall level back to a natural balance.
- Lift midtones: Turn Gamma (Knob 4) slightly clockwise (above center). Notice how shadow detail becomes visible without blowing out highlights.
- Desaturate gently: Reduce Saturation (Knob 3) to about 80%. Colors become more muted and filmic.
- Compare: Toggle each control back to its default position one at a time to hear the difference each correction makes.
Settings
| Control | Value |
|---|---|
| Contrast | 130.0% |
| Brightness | −0.100 |
| Saturation | 80.0% |
| Gamma | 0.400 |
| Edge Gain | 0.0% |
| Edge Cutoff | 0.0% |
| Luma Invert | Off |
| Chroma Invert | Off |
| Edge Invert | Off |
| Edge Rectify | Off |
| Edge Select | Single |
| Luma Blank | 0.0% |
Exercise 2: Edge Sculpting
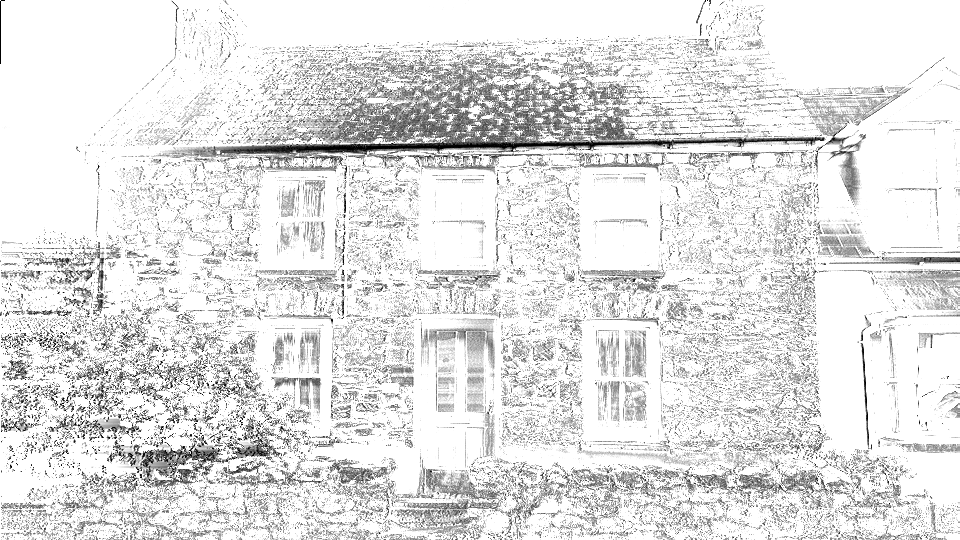 Edge Sculpting — simulated result across source images.
Exercise Illustration
A description of the exercise illustration.
Learning Outcomes
Explore the edge enhancement chain and its rectifier modes to create dramatic edge outlines.
Key Concepts
- The high-pass filter extracts edges; cutoff controls their scale
- The rectifier shapes edge polarity; three toggles yield eight combinations
- Edge gain blends enhanced edges back into the image
Video Source
Footage with strong contours: architectural shapes, faces, or high-contrast graphic patterns.
Steps
- Apply moderate contrast: Set Contrast to about 120% and Gamma slightly above center to establish a clean tonal base.
- Reveal edges: Turn Edge Gain (Knob 5) to about 100%. Turn Edge Cutoff (Knob 6) to about 50%. Bright halos appear along contours.
- Rectify edges: Toggle Edge Rectify (Switch 10) to On. Both sides of each contour now glow, doubling the edge lines.
- Select both edges: Toggle Edge Select (Switch 11) to Both. The edge response becomes more symmetrical and pronounced.
- Invert edge polarity: Toggle Edge Invert (Switch 9) to On. Edge halos become dark grooves. Toggle it back off and notice the difference.
- Threshold carve: Slowly increase Luma Blank (Fader 12) to about 40%. Only the brightest edge-enhanced regions survive, creating glowing outlines on black.
Settings
| Control | Value |
|---|---|
| Contrast | 120.0% |
| Brightness | 0.000 |
| Saturation | 100.0% |
| Gamma | 0.300 |
| Edge Gain | 100.0% |
| Edge Cutoff | 50.0% |
| Luma Invert | Off |
| Chroma Invert | Off |
| Edge Invert | Off |
| Edge Rectify | On |
| Edge Select | Both |
| Luma Blank | 40.0% |
Exercise 3: Inverted Luminance Key
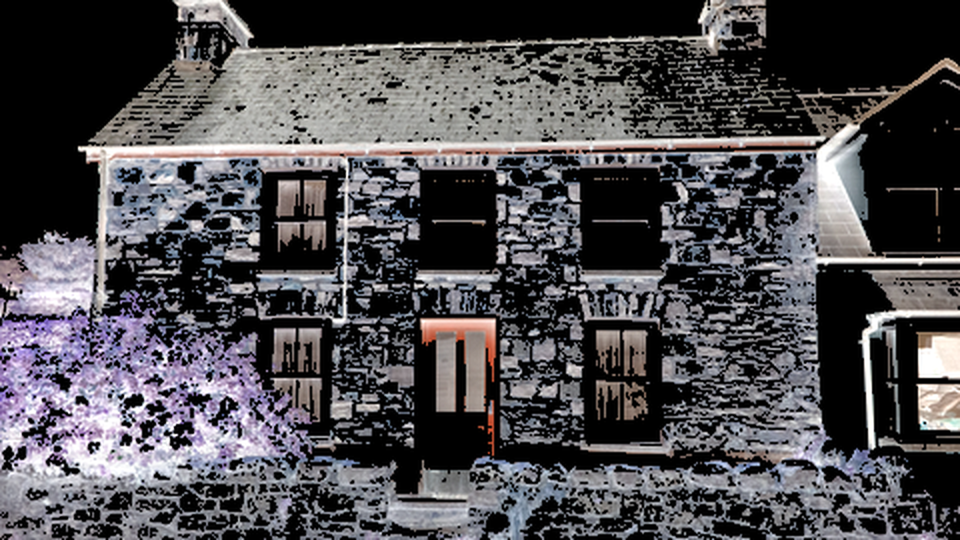 Inverted Luminance Key — simulated result across source images.
Exercise Illustration
A description of the exercise illustration.
Learning Outcomes
Combine gamma curves, inversion, and threshold keying to create a luminance key mask.
Key Concepts
- Gamma extremes create dramatic contrast curves
- Luma Invert flips the tonal map, changing what the threshold keeps
- Chroma Invert shifts hues to their complements
Video Source
High-contrast footage such as silhouettes, text on a background, or stage lighting.
Steps
- Crush with gamma: Turn Gamma (Knob 4) fully counterclockwise. Midtones collapse into shadows, leaving only the brightest highlights.
- Boost contrast: Set Contrast (Knob 1) to about 160% to amplify the stark gamma curve.
- Add edge detail: Set Edge Gain (Knob 5) to about 60% and Edge Cutoff (Knob 6) to about 30%. Edges appear as thin bright lines in the gamma-crushed image.
- Invert luminance: Toggle Luma Invert (Switch 7) to On. The crushed shadows become bright fields; the surviving highlights become dark. The edge lines also invert.
- Invert chroma: Toggle Chroma Invert (Switch 8) to On. Colors shift to complementary hues.
- Key threshold: Increase Luma Blank (Fader 12) until only the desired tonal regions remain. With both inversions active, the threshold carves into the flipped image.
- Adjust saturation: Sweep Saturation (Knob 3) to tint the remaining key regions.
Settings
| Control | Value |
|---|---|
| Contrast | 160.0% |
| Brightness | 0.000 |
| Saturation | 100.0% |
| Gamma | −2.000 |
| Edge Gain | 60.0% |
| Edge Cutoff | 30.0% |
| Luma Invert | On |
| Chroma Invert | On |
| Edge Invert | Off |
| Edge Rectify | Off |
| Edge Select | Single |
| Luma Blank | 50.0% |
Glossary
-
Contrast: The gain factor applied to a signal; higher contrast stretches the difference between dark and light values.
-
Differential Multiplier: A DSP block that scales one signal by another and blends the result with a third, used here to mix edge detail back into the image.
-
Edge Enhancement: Amplifying high-frequency spatial detail along contours to create sharper or more stylized boundaries.
-
Full-Wave Rectification: Folding negative values to positive so that transitions in both directions produce a positive output.
-
Gamma: A nonlinear transfer curve that reshapes the relationship between input signal value and output brightness.
-
Half-Wave Rectification: Passing only one polarity of a signal while clamping the other to zero.
-
High-Pass Filter: A filter that attenuates low frequencies and passes high frequencies, isolating rapid transitions (edges).
-
Luma: The brightness component (Y) of a YUV video signal, representing perceived lightness.
-
Proc Amp: Processing Amplifier; a gain-and-offset stage that applies contrast and brightness adjustment to a signal.
-
Saturation: The intensity of color in a video signal; zero saturation produces monochrome.
-
Threshold Key: A compositing operation that replaces pixels below a brightness cutoff with black, creating a luminance-based mask.